Easy & Stunning Crochet Crop Top Pattern Great for Any Event

This simple and accessible crochet pattern invites beginners and seasoned crafters alike to work at their own pace while enjoying the relaxing rhythm of each stitch. Beyond looking gorgeous, it’s a practical piece that transitions seamlessly between seasons.
Layer it over a tank top, pair it with high-waisted jeans, or wear it as is for effortless summer cool—a handmade crochet crop top is as versatile as it is charming. Plus, working on this project saves money while offering a creative outlet for self-expression.

Special Features
- Houndstooth Pattern - A chic and timeless style created by alternating stitches.
- Customizable Fit - Instructions to adjust measurements for your size are included.
- Fitted Design - Ensures a sleek, clean crop top aesthetic.
- Straps and Button Detailing - Practical yet stylish features to personalize your top.
- Beginner Friendly - Focuses on simple stitches like Single Crochet (SC) and Double Crochet (DC).
Difficulty Level
Beginner – Perfect for beginners who are looking to advance their crochet skills. Includes simple rows, customization tips, and guidance on mistakes to look out for.
Materials Needed
- Yarn: Pink and white yarn (or any two contrasting colors of your choice). Suggested weight: DK or worsted.
- Crochet hook: Recommended hook size for your yarn (usually 4mm–5mm for DK or worsted).
- Stitch markers (at least 2).
- Measuring tape.
- Yarn needles for sewing.
- Buttons: 4 small buttons (or more depending on your customization).
- Scissors.
Step-by-Step Pattern
Step 1: Taking Measurements
- Measure the bust size.
- Example: If your bust size is 32 inches, calculate the foundation chain accordingly.
- Chain the number of stitches matching your measurement. For a 32-inch bust size, chain 115.
- Tip: Add 1–3 extra chains to account for minor shrinking during crocheting.
2: Foundation Chain
- Chain 115 (or the number based on your measurement).
- Add 1 extra chain at the end.
- Place a stitch marker at the last chain to help keep edges straight.
Step 3: Rows 1–5 (Foundation Rows)
- Row 1: Skip the first chain, and work Single Crochet (SC) into the second chain.
- Continue making SC across the entire row.
- Rows 2–5: At the start of each row, chain 1, turn your work, and repeat with SC across the row.
- Make sure to use your stitch marker to help keep edges aligned.
Pro Tip: Always check for mistakes at the end of each row to avoid hassle later on.
4: Houndstooth Pattern Rows
- Switch to white yarn at the end of Row 5.
- Carry the pink yarn along as you work.
- For Row 6 (start of Houndstooth pattern):
- Begin with a Double Crochet (DC) in the first stitch, followed by a Single Crochet (SC) in the next stitch.
- Alternate between DC and SC across the row.
- At the end of the row: If you finish on a SC, start the next row with a DC. If you finish on a DC, start the next row with a SC.
- Repeat this alternating stitch pattern until the desired length is reached.

5: Adjusting the Length
- Determine how long you want the top to be (e.g., 8–9 inches).
- Example: If your top is 8 inches after 26 rows, add more rows of Houndstooth pattern until you reach your desired length.
- Once the Houndstooth section is complete, switch entirely to pink yarn.
- Work 4–5 rows of Single Crochet (SC) in pink for the finishing edge.
6: Edgings for the Sides
- Rotate your project to work along the side edges.
- For the side ties: Chain 40 chains, and work 5 rows of SC along these chains to create sturdy ties.
- Repeat the same process for the second side.
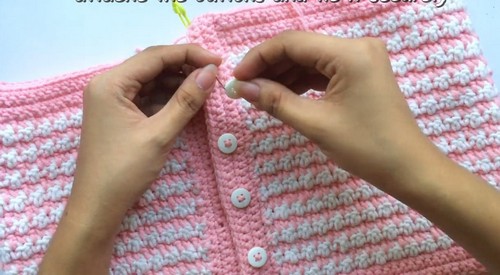
7: Adding Buttonholes and Buttons
- Chain 40 (on the edge) as before.
- On the third row of the chain:
- Place stitch markers where you want the buttons to go. Use the formula: Total chains ÷ (Number of buttons + 1).
- Example: 40 chains ÷ (4 buttons + 1) = 8. Place a button every 8 stitches.
- Work SC as normal but skip the stitch at the marker to create buttonholes (chain 1 in place of the skipped stitch).
- Complete 5 rows and fasten off.
- Use a needle and thread or yarn to attach your buttons to the other side.
8: Adding the Straps
- Use a measuring tape to determine where the straps will attach.
- Measure approximately 8" apart for the front straps. Ensure placement is symmetrical for the back.
- Mark the placement points with stitch markers on the front and back of the top.
- Create the straps:
- Chain 58 chains (or adjust this based on the length needed).
- Make 1 row of SC across these chains, repeating for 5 rows.
- Attach the straps securely to the marked positions with a needle and yarn.

Conclusion
Congratulations! You’ve crocheted your very own Crochet Crop Top with Houndstooth Pattern. This handmade crop top is perfect for summer days, layering over a tank, or showcasing your crochet skills at festivals. With its beginner-friendly design, you’ve mastered alternating stitches and added a touch of elegance to your wardrobe.
Tutor's Suggestions
- If you notice any mistakes, fix them immediately to avoid larger issues later on.
- Use stitch markers to keep your edges straight and organized.
- Customize the pattern by using different color combinations to match your style.
Pro Tip
For sturdier straps, you can double up your yarn or add additional rows of SC to strengthen them. Additionally, remember to wash and block your top after finishing to set the stitches and perfect the fit.