Snuggle into effortless summer style with this free crochet halter top pattern that’s easy and perfect for adding playful flair to outfits.
Crochet halter tops are the perfect blend of style, comfort, and creativity! Whether you're crocheting one for a summer day out, a festival look, or just to add a handmade touch to your wardrobe, this crochet halter top pattern is both easy to follow and beautifully designed.
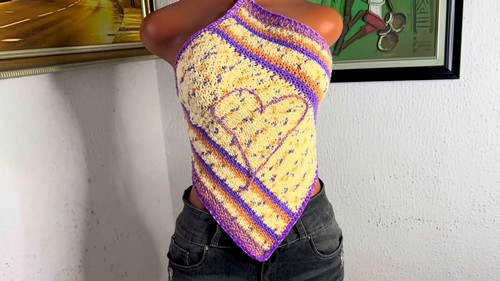
Free Crochet Halter Top Pattern with Velvet Edging

Using a simple yet elegant seed stitch, this pattern creates a textured and breathable fabric that’s flattering on all body types. With customizable colors, a delicate love design, and stylish lace-up straps, you can make it uniquely yours. Get ready to stitch your way to a trendy and timeless handmade piece that you’ll love to wear!

Diamond Heart Halter Top Pattern
Materials List
- Yarn: Lightweight yarn (DK or sport weight), in multiple colors for body and heart motif
- Optional: Velvet yarn for edging
- Hook Sizes:
- 3.5 mm crochet hook (main body)
- 4.0 mm crochet hook (for heart motif and straps)
- Notions:
- Measuring tape
- Tapestry needle
- Stitch markers
- Scissors
Key Abbreviations (US Terminology)
| Abbreviation | Meaning |
|---|---|
| ch | Chain |
| sc | Single crochet |
| dc | Double crochet |
| sl st | Slip stitch |
| st(s) | Stitch(es) |
| rep | Repeat |
| FO | Fasten off |
Special Notes
- The top is constructed as a perfect square (width equals length), worked in alternating single and double crochet ("seed stitch").
- Sizing is versatile—adjust the starting chain to fit your body.
- The square is rotated and worn as a diamond for a trendy shape.
- Heart motif and velvet edging are optional for added flair.
Pattern Instructions
1. Measuring & Foundation Chain
- Determine finished width:
- Measure from high chest across, or estimate finished length you desire.
- Ch desired number (sample: 70 ch for about 14.5" width; adjust for your own size).
- Note: Keep chain count even for the seed stitch to work properly.
2. Row 1 (Seed Stitch Foundation)
- Ch 1 (for turning).
- Skip the first ch; in next ch:
- Sc in this st.
- Next ch:
- Dc in this st.
- Alternate: sc in next, dc in next, across.
- Repeat alternating sc, dc, until end.
- End row with dc.

3. Row 2 and All Subsequent Rows
- Ch 1, turn.
- Start with sc in the first st.
- Dc in next st.
- Alternate across row:
- Sc in each dc from prev row,
- Dc in each sc from prev row.
- Always end row with dc.
- Repeat until your work is a perfect square (i.e., number of rows equals foundation chain length in inches/cm).
Color Changes
- To create stripes or blocks, switch colors at the start of any row.
- Repeat or vary color sequence as desired.
4. Edging (Optional Velvet Finish)
- Switch to velvet yarn (or any contrasting yarn).
- Join yarn at a corner.
- Ch 1, then sc in every stitch around the square, working extra sc into corners for a smooth shape.
- FO and weave in ends.
5. Heart Motif (Center Love Design, Optional)
- Mark shape:
- Use a contrasting yarn and tapestry needle to baste a heart outline in the center (removable).
- With 4.0 mm hook & two strands (for boldness):
- Embroider heart along the marked outline, using slip stitches.
- Insert hook from back to front, yarn over, pull through and sl st along outline.
- Remove marking yarn after embroidery.
- Weave in all ends neatly.

6. Straps (Halter and Back Ties)
- At top corners:
- Attach yarn (use double strands for chunkier ties, sample uses two colors).
- Ch 150 (or desired length for lacing/tying).
- FO. Repeat for second corner.
- At side corners:
- Attach yarn and ch 150 (or adjust for lacing across back or tying).
- FO. Weave in all ends.

7. Assembly & Lacing
- Position square as a diamond (one corner points down).
- Heart motif faces front.
- Tie halter straps around neck.
- Thread side straps through appropriate holes for secured back lacing, using tapestry needle.
- Adjust fit and tie securely.
Conclusion
You have completed a fashionable diamond halter top featuring playful color changes, bold edging, and a fun heart motif. The seed stitch ensures beautiful texture, and custom straps give you a perfect fit.
Pattern Corrections & Tips
- Tip: Always keep the chain count even for neat alternating stitch rows.
- Tip: Measure carefully to maintain a perfect square for the diamond top.
- Tip: When embroidering the heart, mark with removable yarn for guidance and easy correction.
- Correction: If the edging causes puckering, add extra sc at each corner.
- Tip: For chunkier straps, use two strands of yarn or a larger hook.
