Boost your summer style with this free crochet top pattern featuring a comfortable fit and trendy flair, perfect for any casual occasion.
Beautiful clothes can come from simple ideas. One such idea is the crochet top pattern, which gives you a wonderful way to make fashionable tops at home. With only a hook and your favorite yarn, this patterns turn into tops that suit any style or size. Step by step instructions make this project easy to try for everyone. You do not need to know much about sewing or fashion to follow along. Each top can be different by using bold, bright colors or gentle pastels.
How to Crochet Top – Free Step-by-Step Pattern

On sunny days, this top feel light and let your skin breathe. Saving money is another benefit, since you can make something pretty without buying from stores. Crochet top pattern means more freedom to try new designs and feel proud when your friends admire your work. Comfort and style come together with each and every stitch. All ages can enjoy making and wearing this special piece, and every person adds a little bit of their own story to the finished top.
Crocheted Top Pattern
Materials
- Yarn: Hobbi Twister Solid (Cotton/Acrylic blend), fine weight. Yarn is doubled for this pattern usage.
- Approx. 200m for Small (doubled, for one cup; adjust for larger sizes).
- Crochet Hook: 4.0mm (US G/6)
- Other:
- Scissors
- Measuring tape
- Darning (yarn) needle
- Stitch markers
Abbreviations (US Terminology)
- ch – Chain
- sc – Single Crochet
- dc – Double Crochet
- sl st – Slip Stitch
- st(s) – Stitch(es)
- sp – Space
- sk – Skip
- dec – Decrease (single crochet 2 together)
- picot – Ch 3, sl st in first ch
Special Notes
- The pattern is easily adjustable. Change the initial square size and following rows for a custom fit.
- Gauge is based on a 3” x 3” (7.5 x 7.5 cm) square for size Small.
- Work with yarn held double throughout.
- Always maintain an even tension and consistent stitch count in each row.
Sizing Guide
| Size | Starting Ch | Square Size | Square Rows |
|---|---|---|---|
| Small | 15 | 3" (7.5cm) | 13 |
| Medium | ~17 | 3.5" (9cm) | 17 |
| Large | ~19 | 4" (10cm) | 21 |
| X-Large | ~21 | 4.5" (11.5) | 23 |
(Rows given ensure an odd row count. Measure and adjust rows for your desired cup coverage.)
Pattern
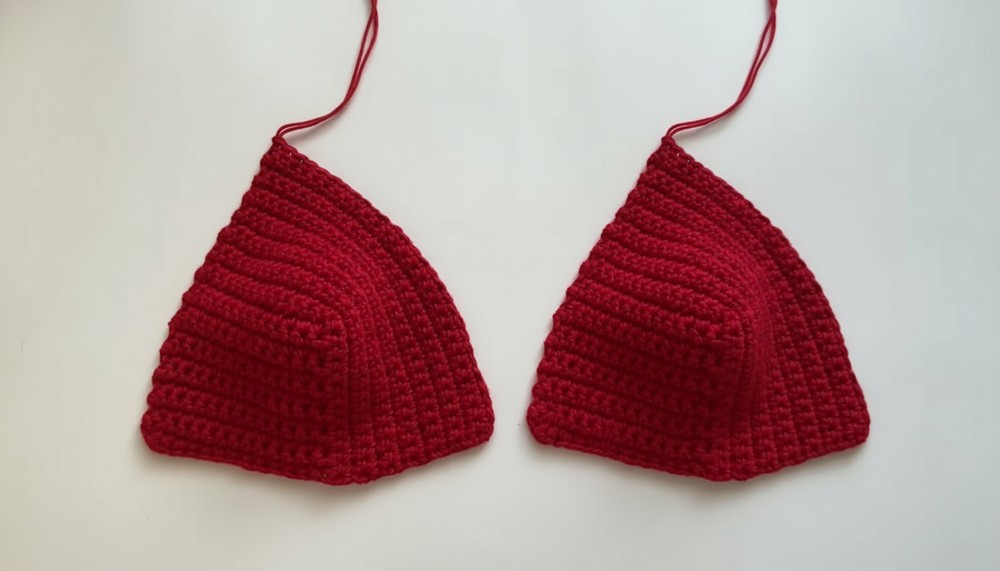
1. Crochet Two Cups
Foundation:
- With doubled yarn, ch 15 (see size chart above to adjust for your size).
- Row 1: Sc in 2nd ch from hook, sc across. (14 sc for Small.)
- Row 2: Ch 1, turn. Sc in first st and each st across.
- Repeat Row 2 until you reach a square (measure both sides for accuracy). See sizing chart for suggested rows.

2. Expand Cup for Full Coverage
- Without cutting yarn, turn and sc along the next two cup sides:
- Sc across original last row, then place 2 sc in the corner, and sc evenly along the raw edge (side of the square), matching the sc count to the original row count (14 in sample; match your row count).
- Place another 2 sc in the next corner (if working continuous).
- Turn, sc across all sts.
- Repeat Rows as needed until the height from the bottom of the added rows to the original square is double the square height (ex: small = 6"/15cm).
- Fasten off, weave ends. Make a second identical cup.

3. Join Cups & Form Underbust Band
- Decide desired orientation for cups (square at top or bottom).
- With both cups, lay flat and join at the lower/outer side(s):
- Ch 15 (or more for greater side coverage).
- Attach with sc to one cup, sc across, attach to next cup, sc across second cup, ch 15 at other end.
- Turn; sc in each ch and sc across entire band.
- Repeat row of sc 2 more times (total: 3 single crochet rows for band).

4. Add Decorative Lower Edge
- Row 1 (lacy band foundation):
- Ch 2 (counts as first dc), dc in next st, ch 1, sk 1 st, dc in next; repeat across.
- At end, ensure two dc in final st.
- Row 2: Ch 1, turn. Sc in each st and ch-sp across.
- Row 3: Ch 2, turn. Dc in next st, ch 1, sk 1, dc in next. End with 2 dc in last st.
- Row 4-6: Sc in each st and ch-sp across (repeat 3 times).
- Continue alternating (Rows 3–4) as established:
- [dc row, 3 sc rows] pattern, until band measures approx. 5”/13cm or your desired depth.
- Finish with 1 row of sc around entire lower edge and sides for neatness.

5. Edging the Whole Top
- For sides and corners:
- Work 1 sc at end of each sc row
- 2 sc at end of each dc row
- At outer points/corners: place 3 sc
- At inner corners (between the cups): dec (sc2tog) to pull together neatly
- Picot Border (optional):
- 3 sc, picot (ch 3, sl st in first ch), 3 sc, repeat along bottom and top curved edges.
- Side Loops (for ties):
- At underarm edges, ch 2, sk 2, sc in next 5, repeat for side lacing holes.

6. Make the Straps
- At the top of each cup, attach yarn, ch 220 (approx. 50–55”/127–140cm).
- Slip st in back bump of each ch back to cup for a sturdy, non-stretchy strap.
- Sc into cup, continue picot border, repeat for second strap.

7. Finishing
- Weave in all ends.
- Adjust straps, ties, and try on for fit.
- Block lightly if desired.
Conclusion
This beautifully simple, highly adjustable top is constructed with easy stitches, perfect for all skill levels. With picot and looped details, you achieve a delicate look, and sturdy back-bump slip-stitched straps provide extra support and durability.
Pattern Corrections & Tips
- Gauge: Measure as you go. Ensure your square is the desired cup width for your size.
- Joining Rows: Always count your stitches at joins and corners to keep symmetry.
- Row Counts: For symmetry, end with an odd number of rows for the square.
- Fit Adjustments: Add or remove “filler” rows at any stage to lengthen/shorten cups or lower band.
- Decoration: Picots and loops are optional—you can edge with simple sc for a more minimal look.
